How To Part Hair For Braids
When you are learning how to braid, one of the most important skills to develop is doing the hair partitions. I believe they are the foundation of any braided hairstyle, and doing them right is the key to achieving a clean, lasting, professional look. Failing to do so has plenty of negative consequences, especially if you want your braiding business to grow. Don’t worry! With some practice, you can master the parting techniques and get your hands on braiding many different styles.
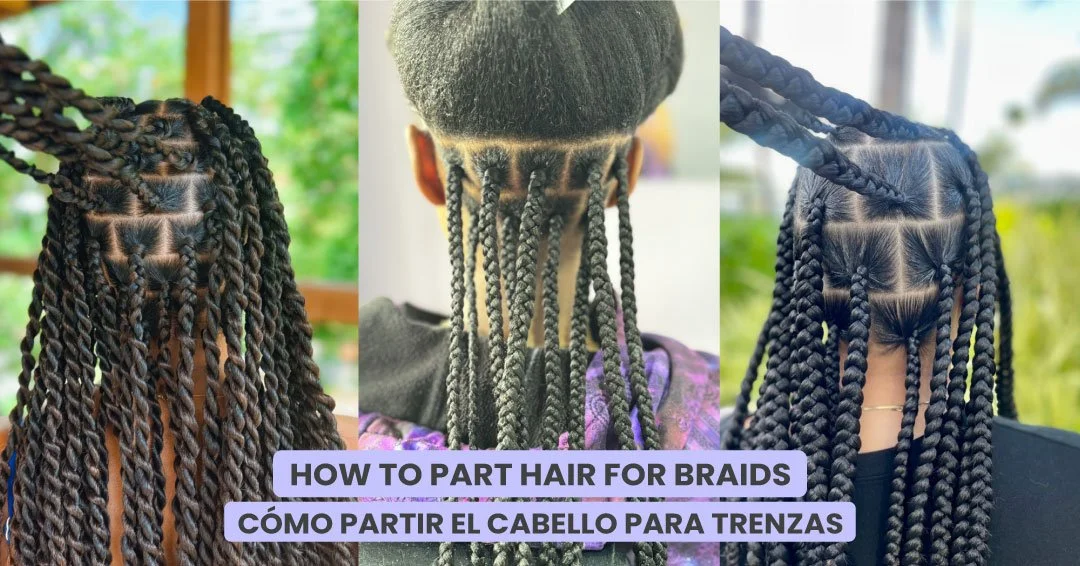
In this article, we’ll talk about how to part hair for box braids for beginners and how the right box braid size charts can make things easier for you. I’ll also give you some tips on how to choose the most flattering hair part according to the client’s features. Additionally, I’ll explain some reasons why you should attempt switching your hair part now and then (and invite your clients to do the same).

The Importance of a Good Hair Part
Parting hair is the first step to turning a messy head into an astounding, work-of-art braided hairstyle that will attract every glance. As a braider, you must commit yourself to achieving a clean part, as it’s the only way to get the desired professional look. Although for some clients with thin, straight hair you can part by using nothing but your fingers and nails, for most hair types you’ll need a good professional braiding comb and some gel. Here’s how to do it:
Use the rat tail of your braiding comb to create your part.
Add gel to the part.
Use the pin tail of your braiding comb to make the part more precise and clean.
Keep hair parts in place by using hairpins or elastic bands.
Check out the video below to see it for yourself. Don’t be afraid! It’s easier than it seems!
How To Get A Middle Part
Professional braiders should be able to create different kinds of hair parts, such as side parts or zig-zag lines. However, when you are learning how to braid hair, nothing is more important than learning to create the perfect middle part.
This is because most braided hairstyles require a middle part. For example, two braids, symmetrical styles like six cornrows, or, in some cases, box braids. Although there are other options we’ll see next, some braiders prefer to start box braids with a middle part in order to achieve more symmetry and balance in their hairstyles.
Should the middle part be exactly in the middle? Not necessarily! Sometimes, it’s better to make the part a few millimeters to one side, depending on how the client’s hair naturally falls.


How To Part Hair For Braids Based on Hairstyles
Different braided hairstyles require different partings! Here are some examples you should consider:
Two braids: This popular hairstyle requires the classic middle part to achieve a balanced result. Keep it perfectly symmetrical!
Side cornrows: This is the best example of how a beautiful side part can create a whole braided hairstyle. Your choice as a professional braider is the right place for the part (closer to the crown or the ear) and which side part flatters your client more.
Fulani braids: According to your client’s choice (or facial features), you can either start from a middle part or a side part. They can both look amazing.
Bob braids: Similarly, bob braids may look great either with a middle or a side part, but because it’s very noticeable, you have to make it perfectly neat!
Medium box braids: Each braider can opt to create medium box braids in any way they want, that's the beauty of being an artist! Also it may be helpful to start your box braids with a middle part if you like to pre-part the hair before starting to braid. When it comes to the individual braids the bricklayer parting pattern is the standard choice for many professional braiders. If you are just starting out, it can be challenging to get the bricklayer pattern right. But we do have size charts that are helpful to avoid second-guessing, especially for beginners… Even I use size charts when creating box braids, so I'm sure you’ll find them very helpful.


How To Part Hair For Braids Based On Facial Features
I’ve seen plenty of reels on social media in which Millennials stick to the side part, and Gen-Zs opt for the middle parts. But is it true that one always looks better than the other? I don’t think so! When it comes to the whole middle part vs. side part debate, I believe the Internet has made us go a bit crazy! Some fiercely attach side parts to a specific age group and claim it makes people look older, but it’s a matter of fashion, not of age… However, not everyone can indeed pull off both a middle and a side part. Still, it doesn’t depend on the number of candles on your birthday cake but on your facial symmetry.
You, as a professional braider, should be ready to guide your clients to help them decide which hair part is more suitable for their facial and hair features. Here’s how:
Thin hair: If your client suffers from hair loss or displays thin hair, a middle part can help conceal those concerns, according to L'Oréal Professionnel Brandon Curtis. This works great for women after giving birth, because after-pregnancy hair loss is very frequent and particularly noticeable.
Asymmetrical faces: Side parts are perfect for highlighting the best side of a client’s face—as well as for hiding some irregularities, such as a big scar, spots, or moles.
Oval faces: While the middle part exaggerates the length of this kind of face, a side part looks perfect on them. A deep side part will create a glamorous look taken right out of the Hollywood screens! However, someone with a rather long face can still pull off the middle part with the help of bangs, layers, or a fringe. They soften the angles of the face.
Round, diamond, or heart-shaped faces: They all look amazing with the middle part. According to Sharon Spellman, from Matrix brand, the middle part “creates the illusion of length and gives the look of perfect symmetry for the face.”
Square faces: The side part helps to soften a strong jawline and cheekbones. With a face with strong features, a soft side part (not too close to the ear) creates the illusion of balance better than the middle part.
No matter your client’s face shape, you can experiment with different parts in front of the mirror and let them choose the one they feel more comfortable with. Since you’re in the braiding business, keep in mind that hair extensions also help to create volume and provide a fantastic frame to any face!

Reasons to Switch a Hair Part
We’ve seen ideas on how to choose a hair part according to the desired look. But did you know that changing your hair part has other benefits besides aesthetic reasons?
According to stylist Michael Anthony, changing your hair part periodically is a way of preventing hair thinning and breakage: “Consistently parting your hair in the same location can lead to a phenomenon known as traction alopecia. This occurs when constant tension on the hair follicles from tight hairstyles or repetitive parting causes hair to thin or break.”
Switching your hair part is great for your scalp health. It fosters better oil distribution and prevents dandruff and irritation.
If you use a flat iron and never change your hair part, you’ll be applying too much heat on the same hair areas, which can cause dry spots.
Changing your part helps you prevent UV damage. If you always part your hair in the exact same spot, that area of your scalp will receive all the sunlight, making it prone to burning.
Plus, changing your part is an almost immediate way to add volume and body to your flat hair, and get a whole new look without needing to cut or dye your hair.
If your client is used to a middle part and refuses to switch it, their hair can still benefit from moving it just an inch or two! The new part might not be geometrically centered, but will still give the illusion of balance. The same applies to side parts: There’s no reason to opt for a dramatic change if they don’t want to.
Additionally, remember that there are intermediate options if you are uncertain whether to choose the middle part or the side part. The diagonal part starts at the side of the hairline but reaches the client’s crown in the middle. The zig-zag line provides an edgy look, perfect for creative braided hairstyles. And bangs are perfect for hidden parts. In any case, what matters most is that the client feels comfortable with their new look!
Now you know how to part hair for braids, how to guide a client who is unsure which hair part is more flattering, and how box braid parting charts can help you achieve a more balanced result as a professional braider. If you want to keep learning about creating amazing braided hairstyles, I invite you to download my free box braid guide. I’m always happy to help a fellow braider. Happy braiding!
Sources:


(Spanish Version)
Cómo partir el cabello para trenzas
Cuando estás aprendiendo a trenzar, una de las habilidades más importantes que debes desarrollar es hacer las particiones del cabello. Creo que son la base de cualquier peinado trenzado y hacerlas bien es la clave para lograr un look limpio, duradero y profesional. No hacerlo tiene muchas consecuencias negativas, especialmente si deseas que tu negocio de trenzado crezca. ¡No te preocupes! Con un poco de práctica, podrás dominar la habilidad de hacer la raya y empezar a trenzar muchos estilos diferentes.
En este artículo, hablaremos sobre cómo hacer la raya del cabello para box braids para principiantes y cómo la tabla de separación de box braids adecuada puede facilitarte las cosas. También te daré algunos consejos sobre cómo elegir la raya más favorecedora según las características de la clienta. Además, explicaré algunas razones por las que deberías intentar cambiar tu raya del cabello de vez en cuando (e invitar a tus clientas a hacer lo mismo).
La importancia de una buena raya del cabello
La raya del cabello es el primer paso para convertir una cabeza desordenada en un peinado trenzado asombroso, una obra de arte que atraerá todas las miradas. Como trenzador, debes comprometerte a lograr una raya limpia, ya que es la única manera de conseguir el aspecto profesional deseado. Aunque para algunos clientes con cabello fino y liso puedes hacer la raya usando únicamente los dedos y las uñas, para la mayoría de los tipos de cabello necesitarás un buen peine para trenzas profesional y un poco de gel. He aquí cómo hacerlo:
Usa la cola de tu peine trenzado para crear tu pieza.
Agrega gel a la raya.
Utiliza la punta de su peine para trenzar para hacer la partición más precisa y limpia.
Mantén las partes del cabello en su lugar usando horquillas o bandas elásticas.
Puedes ver un ejemplo en este video. ¡No te asustes! Es más fácil de lo que parece.
Cómo trenzar: lograr una raya al medio
Los trenzadores profesionales deberían poder crear diferentes tipos de particiones del cabello, como rayas al costado o líneas en zig-zag. Sin embargo, cuando estás aprendiendo a trenzar el cabello, nada es más importante que aprender a crear la raya al medio perfecta.
Esto se debe a que la mayoría de los peinados trenzados requieren una raya al medio. Por ejemplo, dos trenzas, estilos simétricos como seis cornrows o, en algunos casos, box braids. Aunque existen otras opciones que veremos a continuación, algunas trenzadoras prefieren comenzar las box braids con una raya en medio para lograr más simetría y equilibrio en sus peinados.
¿La partición al medio debería estar exactamente en la mitad? ¡No necesariamente! A veces es mejor hacer la raya unos milímetros hacia un lado, dependiendo de cómo cae naturalmente el cabello de la clienta.
Rayas de cabello según los peinados
¡Diferentes peinados trenzados requieren diferentes separaciones! A continuación se muestran algunos ejemplos que debes considerar:
Dos trenzas: Este popular peinado requiere de la clásica raya al medio para lograr un resultado equilibrado. ¡Mantenla perfectamente simétrica!
Cornrows laterales: este es el mejor ejemplo de cómo una hermosa raya lateral puede crear un peinado trenzado completo. Tu elección como trenzador profesional es el lugar adecuado para la raya (más cerca de la coronilla o de la oreja) y qué parte lateral favorece más a tu clienta.
Trenzas Fulani: Según la elección de tu clienta (o sus rasgos faciales), puedes comenzar desde una raya media o lateral. Ambos pueden verse increíbles.
Trenzas bob: De manera similar, las trenzas bob pueden verse increíbles ya sea con una raya en medio o lateral, pero como las particiones son muy notorias, ¡debes hacerlas perfectamente prolijas!
Box braids medianas: Cada trenzador puede optar por crear box braids medianas de la forma que desee, ¡esa es la belleza de ser un artista! Ya mencioné que algunos colegas prefieren una raya media. Otra opción popular es el patrón de separación de ladrillos. ¡Me encanta ese diseño! Por supuesto, puede ser más desafiante. Pero tenemos tablas de tallas que son útiles para evitar dudas, especialmente para principiantes... Incluso yo uso tablas de tallas cuando creo box braids, así que estoy segura de que las encontrarás muy útiles.
Elegir la raya del cabello adecuada para cada rostro
He visto muchos videos en las redes sociales en los que los Millennials se quedan con la raya al costado y la Generación Z opta por la raya al medio. ¿Pero es cierto que uno siempre luce mejor que el otro? ¡No me parece! Cuando se trata del debate entre la parte media y la parte lateral, ¡creo que Internet nos ha vuelto un poco locos! Algunas personas ubican con vehemencia las particiones laterales según un grupo de edad específico y afirman que esto hace que las personas parezcan mayores, pero es una cuestión de moda, no de edad... Sin embargo, no todo el mundo puede llevar una raya al medio y que le quede bien. Aún así, no depende del número de velas que haya en tu tarta de cumpleaños sino de tu simetría facial.
Tú, como trenzador profesional, debes estar preparado para guiar a tus clientes y ayudarles a decidir qué partición del cabello es más adecuada para sus rasgos faciales y capilares. Así es cómo:
Cabello fino: si tu cliente sufre pérdida de cabello o tiene cabello fino, una raya al medio puede ayudar a ocultar esas preocupaciones, según el profesional de L'Oréal Brandon Curtis. Esto funciona muy bien para las mujeres después del parto, porque la caída del cabello después del embarazo es muy frecuente y particularmente notable.
Rostros asimétricos: Las rayas al costado son perfectas para resaltar el mejor lado del rostro de un cliente, así como para ocultar algunas irregularidades, como una gran cicatriz, manchas o lunares.
Rostros ovalados: Mientras que la raya media exagera el largo de este tipo de rostro, una raya al costado les queda perfecta. ¡Una raya lateral profunda creará una apariencia glamorosa sacada directamente de las pantallas de Hollywood! Sin embargo, alguien con una cara bastante alargada aún puede lograr la raya al medio con la ayuda de un flequillo, capas o un flequillo. Suavizan los ángulos del rostro.
Rostros redondos, con forma de diamantes o de corazón: Todos lucen increíbles con la raya al medio. Según Sharon Spellman, de la marca Matrix, la raya en medio “crea la ilusión de longitud y da la apariencia de perfecta simetría al rostro”.
Caras cuadradas: la raya lateral ayuda a suavizar la línea de la mandíbula y los pómulos fuertes. En un rostro con rasgos fuertes, una raya lateral suave (no demasiado cerca de la oreja) crea la ilusión de equilibrio mejor que la raya media.
No importa la forma del rostro de tu cliente, puedes experimentar con diferentes partes frente al espejo y dejar que elija con la que se sienta más cómodo. Ya que estás en el negocio del trenzado, ten en cuenta que las extensiones de cabello también ayudan a crear volumen y proporcionan un marco fantástico a cualquier rostro.
Razones para cambiar una raya del cabello
Hemos visto ideas sobre cómo elegir la raya del cabello según el look deseado. ¿Pero sabías que cambiar la raya del cabello tiene otros beneficios además de los estéticos?
Según el estilista Michael Anthony, cambiar la raya del cabello periódicamente es una forma de prevenir su caída y rotura: “Hacer la raya del cabello constantemente en el mismo lugar puede provocar un fenómeno conocido como alopecia por tracción. Esto ocurre cuando la tensión constante en los folículos pilosos debido a peinados apretados o rayadas repetitivas hace que el cabello se adelgace o se rompa”.
Cambiar la raya del cabello es excelente para la salud del cuero cabelludo. Favorece una mejor distribución de los aceites naturales y previene la caspa y la irritación.
Si usas una plancha y nunca cambias la raya del cabello, estarás aplicando demasiado calor en las mismas áreas del cabello, lo que puede causar manchas de sequedad.
Cambiar tu partición te ayuda a prevenir el daño de los rayos UV. Si siempre haces la raya en el mismo lugar, esa zona del cuero cabelludo recibirá toda la luz del sol, lo que la hará propensa a quemarse.
Además, cambiar tu raya es una forma casi inmediata de agregar volumen y cuerpo a tu cabello liso, y obtener una apariencia completamente nueva sin necesidad de cortarte ni teñirte el cabello.
Si tu clienta está acostumbrada a la raya en medio y se niega a cambiarla, ¡su cabello aún puede beneficiarse moviéndola solo una o dos pulgadas! Es posible que la nueva partición no esté centrada geométricamente, pero aun así dará la ilusión de equilibrio. Lo mismo se aplica a las partes laterales: no hay razón para optar por un cambio dramático si no lo desean.
Además, recuerda que existen opciones intermedias si no estás seguro de elegir la raya media o la raya lateral. La partición diagonal comienza en el costado de la línea del cabello pero llega a la coronilla del cliente en el medio. La línea en zig-zag proporciona una apariencia vanguardista, perfecta para peinados trenzados creativos. Y el flequillo es perfecto para las rayas ocultas. En cualquier caso, ¡lo más importante es que la clienta se sienta cómoda con su nuevo look!
Ahora ya sabes cómo hacer la raya del cabello para las trenzas, cómo guiar a una clienta que no está segura de qué partición del cabello la favorece más y cómo las tablas de separación de box braids pueden ayudarte a lograr un resultado más equilibrado como trenzador profesional. Si quieres seguir aprendiendo sobre cómo crear increíbles peinados trenzados, te invito a descargar gratis mi guía de trenzas en caja. Siempre estoy feliz de ayudar a un compañero trenzador. ¡Feliz trenzado!